01
Apr
12

Offset Keys – Revised

Hi! Sorry about the wait…lots of stuff happening in my personal life that take priority over this.

A bug was reported to me about the Offset Keys tool. It looks like the behavior of the “Time” attribute for keys is causing problems in the previous version of my script. I can’t really fix it because the code itself should work so we’ll use another command to offset keys. Considering how much time it takes to explain everything, you should just look at the differences between the last version and this one. If you look at the overall logic, it’s still pretty much the same, except that I built functions to find the min/max and I’m using the ScaleAndOffset command to replace the broken k.Time method we were previously using. Not that to use the ScaleAndOffset command, I first take my collection of parameters and convert it to a string (the GetAsText part). This can be really useful in a lot of different contexts, we’ll use it in future tools and I’ll go into more details then.

from win32com.client import Dispatch as d

xsi = Application
ks = xsi.GetKeyboardState()

def getCollections(item):
    for param in item.Kinematics.Local.Parameters:
        if param.Keyable:
            collParams.AddItems(param)
            if param.Source:
                collFCurves.AddItems(param.Source)
            
    for property in item.Properties:
        if property.Type == "customparamset":
            for param in property.Parameters:
                if param.Keyable:
                    collParams.AddItems(param)
                    if param.Source:
                        collFCurves.AddItems(param.Source)

def getMinFrame(collFCurves, current):
    minFrame = current
    for fc in collFCurves:
        if fc.GetMinKeyFrame()  maxFrame:
            maxFrame = fc.GetMaxKeyFrame()
    return maxFrame

# Execute                        
if ks(1) != 4:
    collParams = d( "XSI.Collection" )
    collFCurves = d( "XSI.Collection" )
    current = xsi.GetValue("PlayControl.Current")
    sel = tuple(xsi.Selection)
    for item in sel:
        getCollections(item)

    # Move Left 1 frame
    if ks(1) == 2:
        offset = -1
        startFrame = getMinFrame(collFCurves, current)
        endFrame = current
    # Move Left Input frames            
    elif ks(1) == 3:
        offset = -1*float(xsi.XSIInputBox("Number of frames?", "Negative Offset", "3"))
        startFrame = getMinFrame(collFCurves, current)
        endFrame = current
    # Move Right Input frames        
    elif ks(1) == 1:
        offset = float(xsi.XSIInputBox("Number of frames?", "Positive Offset", "3"))
        startFrame = current
        endFrame = getMaxFrame(collFCurves, current)
    # Move Right 1 frame
    else:
        offset = 1
        startFrame = current
        endFrame = getMaxFrame(collFCurves, current)
        
    params = collParams.GetAsText()
    xsi.ScaleAndOffset(params, "siInputParameters", offset, "", startFrame, endFrame, 0, False, "siFCurvesAnimationSources", True, "", False)

# Alt Menu    
else:
    XSIUIToolkit.MsgBox( '''=============================================
    
Author:    Phil Melancon
Website:    https://philmelancon.wordpress.com/

=============================================

Notes about this tool:

pmOffsetKeys allows you to quickly move the keys in one direction or another using the current frame as a starting point

=============================================

Instructions:

Select your animated objects
Run the script:
Default:        Offset by 1 frame to the right
Crtl:        Offset by 1 frame to the left
Shift:        User input offset to the right
Shift+Ctrl:        User input offset to the left

=============================================
''', 0, "pmOffsetKeys Info" )
06
Mar
12

Offset Keys

Hi, small change of plans for this week’s tool. Someone from work asked me a couple of days ago if I could explain how my offset keys tool worked exactly. This is my first request so I’m more than happy to oblige!

Small tip before we start:
Usually, when I start a new tool, I’ll do all the steps manually, look at the script editor’s log, and go from there. However, when it comes to doing operations in the FCurve editor, such as changing the interpolation, moving keys around, changing the extrapolation, etc, nothing gets logged. When situations like this happen, you can always try to find what your’re looking for in the SDK Guide. One neat way to find out information about stuff you want to do is to type in a keyword (such as “FCurve” or “Keys”) in the script editor, highlight your keyword and press F1.

As usual, let’s beakdown what we want to do before we actually start coding.

The purpose of this tool is to mimick the behavior of “Ripple” when moving keys in the timeline, except that we want to be able to do it in the other direction too (move keys that are before the moved key towards the left). Basically, if we decide to offset keys to the right, everything after the current frame will get offset, if we offset keys to the left, everything before the current frame will get offset. Here’s what we need to know:

# Decide which way you want to offset your keys
# Find out what the current frame is
# Get the keys for all animated parameters
# Find out our minimum or maximum key frame depending on the direction we want to offset
# Offset all the keys between the current frame and the min or max

The whole point of doing this script is to speed up your workflow, so the default behavior of the tool should be to offset keys without any user input. However sometimes you might want to offset keys by a specific number of frames so we’ll add the option to ask the user by how many frames he wants to offset his keys. Once again, the keyboard state will be useful. We will have 4 different behaviors:

1. Offset by 1 frame to the right
2. Offset by 1 frame to the left
3. Offset by a chosen number of frames to the right
4. Offset by a chosen number of frames to the left

To keep things intuitive, we’ll set up our keyboard states so that if Ctrl is pressed, we will always move keys to the left, if Shift is pressed, we will always ask the user by how many frames he wants to offset the keys.

This will be the resulting options
Default: Offset by 1 frame to the right
Shift: Offset by a chosen number of frames to the right
Ctrl: Offset by 1 frame to the left
Ctrl+Shift: Offset by a chosen number of frames to the left
Alt: Our usual help menu

First, let’s write a quick function to grab all the FCurves from our objects. To make the logic a little easier and avoid using global variables, we will use the softimage Collection object. With that in mind, let’s set up our variables.

def getCurves(item):
    for param in item.Kinematics.Local.Parameters:
        if param.Keyable and param.Source:
			collFCurves.AddItems(param.Source)			
            
    for property in item.Properties:
        if property.Type == "customparamset":
            for param in property.Parameters:
                if param.Keyable and param.Source:
					collFCurves.AddItems(param.Source)

So what I did there is get all the local parameters (which hold the FCurves) and then loop through them to find out which ones are keyable and make sure that an FCurve exists for that parameter. Once we find a keyable parameter with an FCurve, we add that FCurve to our collection object (we will create it outside of the function later on). I’ve also added a little something to grab custom parameters just in case you have them in your setup.

We’ll now work outside the getCurves function. We’ll need to grab our selection and loop through the items to send them to our function so that we end up with a big collection containing all the fcurves. Here, the use of “d” represents dispatch, which we will add to our global variables when we bring the script together.

collFCurves = d( "XSI.Collection" )
KeyCollection = d( "XSI.Collection" )
pc = xsi.GetValue("PlayControl.Current")
sel = tuple(xsi.Selection)
for item in sel:
	getCurves(item)

Now this should fill up our empty collection with all the FCurves that match our criteria. We can now move on to the main logic; checking what the keyboard state is and move the keys accordingly. Here’s how it would look if Ctrl was pressed:

if ks(1) == 2:
	for fc in collFCurves:
		KeyCollection = fc.GetKeysBetween(fc.GetMinKeyFrame(), pc)
		for k in KeyCollection:
			k.Time = k.Time-1

There are many ways to move keys in the timeline. For this example, as you can see, I chose to modify each key’s “Time” attribute. You could also look up other ways to do this, some might be more optimized, others might be slower, this is just one of the ways you can reach your goal.

But what about user input? We decided earlier that we wanted to have the option to ask the user how many frames of offset to use. To do that we need some form of feedback and we can get just that with “XSIInputBox”. Look it up in the manual to know more about it, in the meantime here’s an example:

elif ks(1) == 3:
	offset = float(xsi.XSIInputBox("Number of frames?", "Negative Offset", "3"))
	for fc in collFCurves:
		KeyCollection = fc.GetKeysBetween(fc.GetMinKeyFrame(), pc)
		for k in KeyCollection:
			k.Time = k.Time-offset

That’s it, now we just need to finish up the logic, then put all the pieces together and add our variables and alt-click menu. Once you’ve done all of that, you should end up with something that looks like this:

from win32com.client import Dispatch as d

xsi = Application
ks = xsi.GetKeyboardState()

def getCurves(item):
    for param in item.Kinematics.Local.Parameters:
        if param.Keyable:
			collFCurves.AddItems(param.Source)
			
            
    for property in item.Properties:
        if property.Type == "customparamset":
            for param in property.Parameters:
                if param.Keyable:
					collFCurves.AddItems(param.Source)

# Alt Menu				   
if ks(1) == 4:
	XSIUIToolkit.MsgBox( '''=============================================
	
Author:	Phil Melancon
Website:	https://philmelancon.wordpress.com/

=============================================

Notes about this tool:

pmOffsetKeys allows you to quickly move the keys in one direction or another using the current frame as a starting point

=============================================

Instructions:

Select your animated objects
Run the script:
Default:		Offset by 1 frame to the right
Crtl:		Offset by 1 frame to the left
Shift:		User input offset to the right
Shift+Ctrl:		User input offset to the left

=============================================
''', 0, "pmOffsetKeys Info" )


else:
	collFCurves = d( "XSI.Collection" )
	KeyCollection = d( "XSI.Collection" )
	pc = xsi.GetValue("PlayControl.Current")
	sel = tuple(xsi.Selection)
	for item in sel:
		getCurves(item)

	# Move Left 1 frame
	if ks(1) == 2:
		for fc in collFCurves:
			KeyCollection = fc.GetKeysBetween(fc.GetMinKeyFrame(), pc)
			for k in KeyCollection:
				k.Time = k.Time-1
	# Move Left Input frames			
	elif ks(1) == 3:
		offset = float(xsi.XSIInputBox("Number of frames?", "Negative Offset", "3"))
		for fc in collFCurves:
			KeyCollection = fc.GetKeysBetween(fc.GetMinKeyFrame(), pc)
			for k in KeyCollection:
				k.Time = k.Time-offset
	# Move Right Input frames		
	elif ks(1) == 1:
		offset = float(xsi.XSIInputBox("Number of frames?", "Positive Offset", "3"))
		for fc in collFCurves:
			KeyCollection = fc.GetKeysBetween(pc, fc.GetMaxKeyFrame())
			for k in KeyCollection:
				k.Time = k.Time+offset
	# Move Right 1 frame
	else:
		for fc in collFCurves:
			KeyCollection = fc.GetKeysBetween(pc, fc.GetMaxKeyFrame())
			for k in KeyCollection:
				k.Time = k.Time+1

Voila! We have a tool that can move keys in the timeline. I find it really useful when blocking out shots, I hope you guys can find some use for it too!

-Phil

25
Feb
12

Copy Animation

Hi, I had something a little more advanced planned for this week’s tool but I have a cold and my brain won’t collaborate… it seems to want to escape through my nose instead of writing a long and useful tool. Instead of what I had originally in mind, we’ll just simplify the copy/paste animation process using a little logic.

The current workflow:
Select animated object
Click a menu
Choose if you want to copy all transforms, just rotation, just scaling, just position, or marked parameters
Select the target object
Click a menu
Paste animation

What I want the workflow to become:
Select the source object(s)
Select the target object(s)
Run the script (use the keyboard state to handle all types of copy)

Let’s plan our code again to help figure out the structure of our script

#Store Selection
#Make sure an even number of objects have been selected
#Create pairs of objects to copy from and paste to
#Copy/Paste the animation based on the keystate

If it sounds simple, it’s because it is!

First, we’ll store the selection in a variable.

xsi = Application
sel = xsi.Selection

Then, we’ll need to make sure the selection contains an even number of items, otherwise we’ll end up with a lonely object and won’t know what to do with it. We’ll do that using the Count method.

if sel.Count%2 == 0:
	matchControls(sel)
else:
	print 'You need to select an Even number of controllers'

So now, if our selection is uneven, the script will print out a small message and won’t execute. If the selection is even, it’ll send our selection to a function named matchControls. Let’s build that function!

We need the next part of the script to split up the selection in the middle so that we have on one side our animation sources and the targets on the other side. Once we have the first half of the list of objects, we can figure out which objects matches in the 2nd half and copy the animation from one to the other.

def matchControls(oControls):
	a = oControls.Count/2	
	for id in range (0, a):
		ctrls = returnPair(oControls, id)
		copyAnim(ctrls)

So What we have now is a variable that represents half the number of objects in the selection. We’ll loop through a range of values that will represent the indices of our source objects and send those through a pairing function that will return pairs of source/target objects. We will then be able to send those pairs through a function that will do the actual copy/pasting of animation.

Let’s work on the pairing function first. This is rather easy math, the index of our source object should match the index of our target object plus half the total number of objects in the original selection.

def returnPair(oControls, id):
	half = oControls.Count/2
	firstCtrl = oControls(id)
	secondCtrl = oControls(id+half)	
	pair = [firstCtrl, secondCtrl]
	
	return pair

Now that we have our paired objects, we can send them to the copy function which we will write next. Our pairing function returned lists of 2 objects, the first one is the source, the second one our target. Our function will thus look something like this:

def copyAnim(oControls):
	source = oControls[0]
	target = oControls[1]
	xsi.CopyAllAnimation2(source, "siFCurveSource", "siTransformParam")
	xsi.PasteAllAnimation(target)

Now we’ll modify it a bit so that it will cover all the possibilities using the keyboard state we learned in the first script we wrote.

Once rearranged, our final script will look like this:

xsi = Application
sel = xsi.Selection
ks = xsi.GetKeyboardState()

def copyAnim(oControls):
	source = oControls[0]
	target = oControls[1]
	mode = ''
	#Shift
	if ks(1) == 1:
		mode = 'siTranslationParam'
	#Ctrl
	elif ks(1) == 2:
		mode = 'siRotationParam'
	#Shift+Ctrl
	elif ks(1) == 3:
		mode = 'siMarkedParam'
	#Ctrl+Alt
	elif ks(1) == 6:
		mode = 'siScalingParam'
	#Default
	else:
		mode = 'siTransformParam'
		
	xsi.CopyAllAnimation2(source, "siFCurveSource", mode)
	xsi.PasteAllAnimation(target)
	
def returnPair(oControls, id):
	half = oControls.Count/2
	firstCtrl = oControls(id)
	secondCtrl = oControls(id+half)	
	pair = [firstCtrl, secondCtrl]
	
	return pair
	
def matchControls(oControls):
	a = oControls.Count/2	
	for id in range (0, a):
		ctrls = returnPair(oControls, id)
		copyAnim(ctrls)

#Alt menu
if ks(1) == 4:
	XSIUIToolkit.MsgBox( '''=============================================
	
Author:	Phil Melancon
Website:	https://philmelancon.wordpress.com/

=============================================

Notes about this tool:

pmCopyAnim simplifies the process of copy/pasting animation from one object to another

=============================================

What this tool does:

Running this script while having an even number of items selected will split the list halfway and copy the animation from the first object of the first half to the first object of the second half, the 2nd object with the 2nd object, etc.

=============================================

Instructions:

Select an even number of objects
Run the script:
Default:		Copy all transforms
Shift:		Copy translation
Ctrl:		Copy rotation
Alt+Ctrl:		Copy scaling
Shift+Ctrl:		Copy marked parameters

=============================================
''', 0, "pmCopyAnim Info" )

else:
	if sel.Count%2 ==0:
		matchControls(sel)
	else:
		#Error message
		XSIUIToolkit.MsgBox('You need to select an even number of controllers', 0, 'ERROR')

Note that I’ve added my alt-run info menu and a popup error message box in the case of the script being run with an uneven number of objects selected.

That’s it for this week!

22
Feb
12

ICE and Scripting

Hi, unfortunately I didn’t have a lot of free time to prepare this week’s post so there won’t be a tool available for download. I am still going to teach you some neat tricks if you’re willing to learn though.

This will be a half ICE / half script kinda deal again. We’ll learn something that I will one day implement in one big and really useful tool that will forever replace the current Deform Motion tools that are available in softimage because, let’s face it…they’re pretty bad! We won’t build the complete tool just yet, it’s quite an undertaking and I still need to clean up some code to make it all lighter and cleaner but I do have a prototype working that’s been production-proven so expect to see that appear at some point in the future.

The main goal of this exercise will be to try to copy animation FCurves from an animated object to some ICE FCurves because without a custom ICE node that reads FCurve data, that’s pretty much your best bet to access animation from ICE.

Alright, let’s start! We will build a really simple compound that doesn’t really do anything by itself. Now that you know how to import nodes and connect them together and make a compound, I’ll just show you the final result:

So what I’ve done is expose the 3 FCurve profiles so that they’re accessible from the outside of the compound, I’ve also grouped the In values in a single port using a passthrough node (you could also have used a scalar node instead of the pass through). The 3 outputs will reconstruct a 3D vector and that vector is our compound’s output.

That’s it! That’s all we need to build our proof of concept script. This one won’t be all that reusable, this is just to learn how things work so that we can later on use the concepts from this exercise in a more complex context. With this in mind, our variables won’t be as flexible as they usually are.

xsi = Application

null = xsi.Selection(0)
pntcloud = xsi.Selection(1)

Since this is only for testing purposes, we’ll set some rules for ourselves and follow them. We will always select the animated object first (in my case I use a null so I named my variable ‘null’) then the object that contains the ICETree (in my case, a pointcloud).

We’ll only cover the position FCurves in this post for the sake of simplicity so let’s grab the FCurves for the 3 position parameters.

posx = null.Kinematics.Local.Parameters('posx').Source
posy = null.Kinematics.Local.Parameters('posy').Source
posz = null.Kinematics.Local.Parameters('posz').Source

So now, we have the actual FCurves stored in variables, what we need now is the FCurve profiles from the ICETree. This is where things get a bit tricky. To access ICE nodes, you first need to grab the ICETree, then use a rather unpleasant succession of NestedObjects to find what you’re looking for. The nice thing about NestedObjects though is that you can just look at the explorer, use the names as they are written there, and you’ll most likely get what you’re looking for (see the example below)

tree = pntcloud.ActivePrimitive.ICETrees(0)
ports = tree.NestedObjects('Descendant Nodes').NestedObjects('Parameter FCurves').NestedObjects('Exposed Ports').NestedObjects

That gets us all the exposed data from our compound (don’t forget to export and re-import it, sometimes the port numbers get rearranged during the process). To find out where the FCurves from our compound are located within those exposed ports, we can use a temporary piece of code:

for index, port in enumerate(ports):
	print 'port #%s:  %s' % (index, port)

The %s that are used here tell the script to replace those characters by the values referenced outside the string. In my case, this is what I get when I print out my ports:

# port #0:  pointcloud.pointcloud.ICETree.Parameter_FCurves.Y
# port #1:  pointcloud.pointcloud.ICETree.Parameter_FCurves.X
# port #2:  pointcloud.pointcloud.ICETree.Parameter_FCurves.Z
# port #3:  pointcloud.pointcloud.ICETree.Parameter_FCurves.Vector
# port #4:  pointcloud.pointcloud.ICETree.Parameter_FCurves.Time

Using this, I now know that:

x = ports(1).Value
y = ports(0).Value
z = ports(2).Value

With 3d objects, you can usually copy FCurves directly, however ICE doesn’t allow us to simply paste our stored FCurves so we’ll need to rebuild them from scratch. Don’t worry though, this process is really fast. To build an FCurve you need 3 things, the key values, the frame at which they can be found, and the tangents associated with those keys.

Let’s build a function that will handle that part. Since we have the FCurves already, we can easily extract the keys from them, and from those keys, we can find out on what frames they are set and what tangent values they hold.

def pasteFCurve(source, target):
	keys = []
	tangents = []

	for key in source.Keys:
		keys.append(key.Time)
		keys.append(key.Value)
		tangents.append(key.LeftTanX)
		tangents.append(key.LeftTanY)
		tangents.append(key.RightTanX)
		tangents.append(key.RightTanY)

	target.SetKeys(keys)
	target.SetKeyTangents(tangents)

That’s it, let’s reassemble everything and we’ll end up with something like this:

xsi = Application

null = xsi.Selection(0)
pntcloud = xsi.Selection(1)


def pasteFCurve(source, target):
	keys = []
	tangents = []

	for key in source.Keys:
		keys.append(key.Time)
		keys.append(key.Value)
		tangents.append(key.LeftTanX)
		tangents.append(key.LeftTanY)
		tangents.append(key.RightTanX)
		tangents.append(key.RightTanY)

	target.SetKeys(keys)
	target.SetKeyTangents(tangents)

posx = null.Kinematics.Local.Parameters('posx').Source
posy = null.Kinematics.Local.Parameters('posy').Source
posz = null.Kinematics.Local.Parameters('posz').Source

tree = pntcloud.ActivePrimitive.ICETrees(0)

ports = tree.NestedObjects('Descendant Nodes').NestedObjects('Parameter FCurves').NestedObjects('Exposed Ports').NestedObjects

x = ports(1).Value
y = ports(0).Value
z = ports(2).Value

pasteFCurve(posx, x)
pasteFCurve(posy, y)
pasteFCurve(posz, z)

If you followed the steps above, you should end up with a script that will take the position FCurves from your animated null and copy them to your compound. This may seem useless now, but in a few weeks I might make you change your mind!

Sorry about the lack of production-ready tool this week, I’ll try to make it up next time

-Phil

12
Feb
12

PointTracker – Part 2

Hi again! This will be the 2nd part to our tracker, the script to automate the creation of the tracker and the setup of the ICETree.

If you look at the way we built our compound last week, we need only 3 things for it to function. We need a tracker object to put it on, a mesh object’s name, and a vertex number. Seems simple enough!

Let’s start by planning what we need to do step by step.

#Set up variables
#Get indices from selection
#Get object's name
#Create tracker object
#Create ICETree on tracker object
#Use our collected data to set the tracker compound

Now that we have a clear and concise game plan, let’s approach it step by step and break it down further.

Step 1: Set up variables
We’ll obviously start with our usual xsi variable. From our general breakdown, we also know that we will need to store a selection’s name and some vertex numbers, a string can’t be changed once it’s set so we’ll use a return value from a function to get that, but for the points we’ll use a list and lists are dynamic so we can set that up right now. We’ll also make sure to use a single selection for our mesh, from my experience, multiple meshes at the same time tend to be a bit problematic when dealing with subcomponents.

xsi = Application
selection = tuple(xsi.Selection(0))
points = []
ID = 0

Step 2: Get data from selection
We’ve setup the variables, now we need some data to put in them. We’ll have to extract the name of the object and the IDs of the points that have been selected.
Lucky for us, all that data is contained within a very useful parameter, FullName. If you select a couple of vertices on your mesh and print out the FullName of your selection:

print Application.Selection(0).FullName

you’ll end up with something that looks like this:

# Model.sphere.pnt[20,48]

All the info we need is in there, we have our point IDs, and the name (including parent model) of our mesh. We just need to do some small string manipulation to get all that data in the format we need. If you’re now familiar with string manipulation in python, have a look at the official documentation. The name of our object is basically everything that comes before the “.pnt[]” part, so we can simply use rfind to get the character ID of the last dot and get everything before it.

def getData(item):
	allData = item.FullName
	dotID = allData.rfind('.')
	name = allData[:dotID]

Next, we need to get all the different point IDs from the brackets, so let’s look for all the characters contained within brackets and work from there (we’ll keep this in the same function).

	IDin = allData.find('[')
	IDout = allData.find(']')
	ptIDs = allData[IDin+1:IDout]

What we have now is a string with comma-separated ID numbers that we need to isolate and convert to integers.

	idList = []
	stringList = ptIDs.split(',')
	for pt in stringList:
		points.append(int(pt))

This all looks good for multiple vertices, however it would fail miserably in the case of a single vertex selection because the script wouldn’t be able to find the comma. To prevent this, we can filter out single from multiple selections by using a simple “if” statement.

	if "," in ptIDs:
		stringList = ptIDs.split(",")
		for pt in stringList:
			points.append(int(pt))
	else:
		points.append(int(ptIDs))

So in the end, our function would look something like this (don’t forget to return the mesh name if you want to be able to use it later on):

def getData(item):
	allData = item.FullName
	dotID = allData.rfind('.')
	name = allData[:dotID]
	
	IDin = allData.find('[')
	IDout = allData.find(']')
	ptIDs = allData[IDin+1:IDout]
	
	if "," in ptIDs:
		stringList = ptIDs.split(",")
		for pt in stringList:
			points.append(int(pt))
	else:
		points.append(int(ptIDs))
		
	return name

Ok! We have access to our data, it’s formatted properly so we can use it in the compound, so the next step will be to create the tracking object. I like to use nulls for this but any type of object would do. You could even use the key state trick we learned in the FCurve Interpolation tool to have different types of objects created depending on the keys the user presses while running the script. In my case I’ll keep things simple and just use a null, feel free to experiment.

Step 3: Create tracker
We’ll need to create one null per selected vertex, to do that we’ll need to know how many were selected. Since we have a list of all the point numbers already, we might as well use it. We already have our points all nicely set up in a list so we can use len() to get that number. We’ll use the result in a for loop so don’t forget to add 1 to the value you get, ranges aren’t inclusive of the last value so you would end up missing one tracker.

def createTracker(points):
	total = len(points)
	for each in range(1, total+1):
		tracker = xsi.GetPrim("Null", "TRK_"+mesh+"_" + str(point))

Step 4: Create ICETree
While we’re creating our trackers, we’ll also create our ICETrees, so we’ll call our tree building function from the createTracker function. This script will assume that you are using the compound that we built last week and that you have it in your user compound folder. If you have it somewhere else or named it differently, edit the path accordingly.

First, we build our tree

def buildICETree(point, tracker, mesh):
	xsi.ApplyOp("ICETree", tracker, "siNode", "", "", 0)
	tree = tracker.ActivePrimitive.ICETrees(0)

Then, we’ll store the execute port in a variable to enable us to connect the compound later on

	execPort = tree.NestedObjects('Port1')

Now, import the compound (this is where you’d want to put your own path if you put it somewhere other than the user compounds folder). Note that we’re using c.siUserPath, which means we’ll have to import contants as c again, we’ll add that to the top of our variables when putting the script together.

	compound = XSIUtils.BuildPath( Application.InstallationPath(c.siUserPath), "Data", "Compounds", "pmTracker.xsicompound" )
	TrackerCompound = xsi.AddICECompoundNode(compound, tree)

We’ll also need a get Data node to set our mesh reference

	meshNode = xsi.AddICENode("GetDataNode", tree)
	meshNode.Parameters('reference').Value = mesh

And now, we just connect everything up and set the vertex ID

	xsi.ConnectICENodes(execPort, str(TrackerCompound)+'.Execute')
	xsi.ConnectICENodes(str(TrackerCompound)+'.Mesh_Name', str(meshNode)+'.outname')
	xsi.SetValue(str(TrackerCompound)+'.Index', point)

This is pretty much all that’s needed to make the script work, however, we’ll add one last thing to the script. This is meant to be used only with a specific type of sub components. We’ll build a small function that checks to make sure that the selection is indeed vertices before it tries to build trackers and crashes, polluting the scene with useless nulls.

def selType(item):
	if item != None:
		if item.Type == "pntSubComponent":
			return True
		else:
			return False
	else: return False

Now if the selection is anything other than vertices, the function will return a False value, so we can stop the process at that point.

We have all the elements we need, so let’s put everything together

import win32com.client
from win32com.client import constants as c
xsi = Application
selection = xsi.Selection(0)
ks = xsi.GetKeyboardState()
points = []
ID = 0

## Check if selection contains points
def selType(item):
	if item != None:
		if item.Type == "pntSubComponent":
			return True
		else:
			return False
	else: return False

## Get and format data from selection
def getData(item):
	allData = item.FullName
	dotID = allData.rfind('.')
	name = allData[:dotID]
	
	IDin = allData.find('[')
	IDout = allData.find(']')
	ptIDs = allData[IDin+1:IDout]
	
	if "," in ptIDs:
		stringList = ptIDs.split(",")
		for pt in stringList:
			points.append(int(pt))
	else:
		points.append(int(ptIDs))
		
	return name

## Create Nulls for each vertex
def createTracker(points, mesh):
	for point in points:
		tracker = xsi.GetPrim("Null", "TRK_"+mesh+"_" + str(point))
		buildICETree(point, tracker, mesh)

## Create ICETree, import compound and set inputs
def buildICETree(point, tracker, mesh):
	xsi.ApplyOp("ICETree", tracker, "siNode", "", "", 0)
	tree = tracker.ActivePrimitive.ICETrees(0)
	execPort = tree.NestedObjects('Port1')

	compound = XSIUtils.BuildPath( Application.InstallationPath(c.siUserPath), "Data", "Compounds", "pmTracker.xsicompound" )
	TrackerCompound = xsi.AddICECompoundNode(compound, tree)

	meshNode = xsi.AddICENode("GetDataNode", tree)
	meshNode.Parameters('reference').Value = mesh

	xsi.ConnectICENodes(execPort, str(TrackerCompound)+'.Execute')
	xsi.ConnectICENodes(str(TrackerCompound)+'.Mesh_Name', str(meshNode)+'.outname')
	xsi.SetValue(str(TrackerCompound)+'.Index', point)

## Alt-click Menu
if ks(1) == 4:
	XSIUIToolkit.MsgBox( '''=============================================
	
Author: Phil Melancon
Website: https://philmelancon.wordpress.com/

=============================================

Notes about this tool:

pmTracker assumes that the pmTracker compound can be found in your User Compounds folder.
If you don't have it, download it from the download section of my website.
If you put it somewhere else for whatever reason, modify line 46 of this script accordingly.

=============================================

What this tool does:

Running this script while having vertices selected will create one null per vertex and constrain one to each vertex.

=============================================

Instructions:

Select vertices
Run the script

=============================================
''', 0, "pmTracker Info" )

else:
	if selType(selection):
		mesh = getData(selection)
		createTracker(points, mesh)
	else:
		print "Select vertices first"


You might notice some small modifications to what we wrote up until now. The main addition is something that was suggested by a colleague of mine. From now on, my scripts will all contain an alt-click Pop-Up menu that will serve as an information source about the tool. I will eventually modify the existing scripts in the download section accordingly.

Cheers!

04
Feb
12

PointTracker – Part 1

Hi! The next tool will be something that I often use for constraints or ghosting. Most times in a production environment you won’t be able to add clusters to meshes in referenced models, so using Object to Cluster is often not a possibility. To go around this issue, we’ll do our first ICE tool! I will divide this tool in 2 parts, the 1st one will be dedicated to building the compound, the 2nd part will be where we write a small script to enable us to select vertices and have our trackers stick to them without having to go into the ICETree.

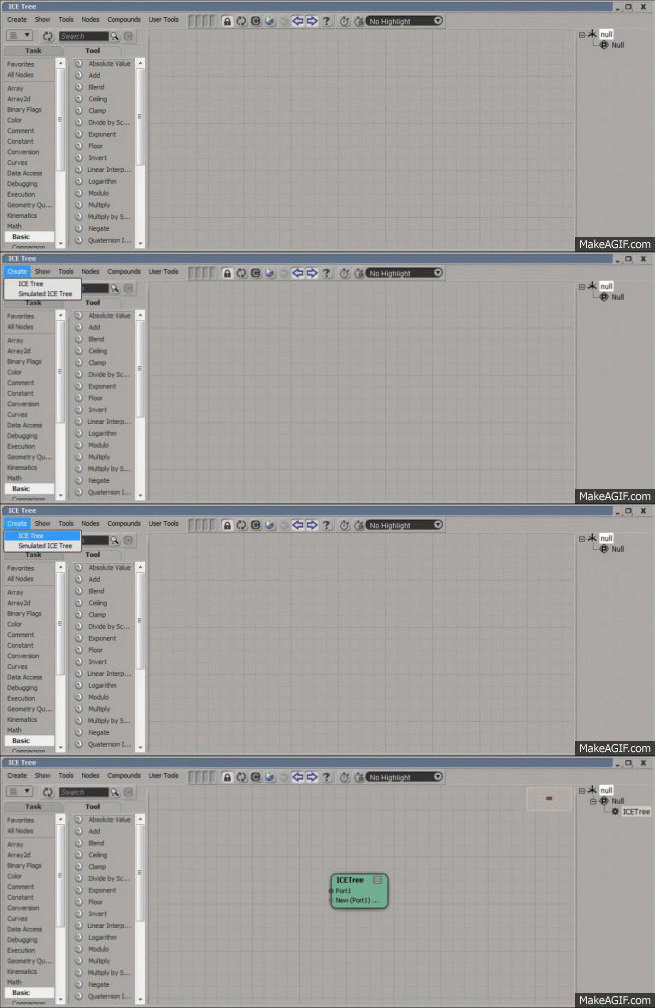
Let’s start with a mesh and a null. I’ll use a simple sphere for the mesh, the null will be the tracker that’s tied to a vertex on the sphere. Select your null and open up the ICE view (View–General–ICE Tree). Once you’ve done that, create a non-simulated tree.

One question you might be asking yourself right now is: Why did we create the ICETree on the null instead of the sphere? The answer is simple, we want our ICETree to stay in the scene even when working with referenced models. It’s easy to add a null to a scene, so keeping the ICETree contained on that null will ensure that its effect also remains. It also makes the cleanup easier, if you don’t need the tracker anymore, just delete it, no need to go hunting for the ICETree, it’ll get deleted automatically with the null instead of staying, broken, on the sphere.

Now, what we want to do is get the position and orientation of one vertex from that sphere. That means we’ll need our sphere in the ICE graph. Select the mesh and drag it into the ICE view. Once you’ve got your sphere, you’ll want to extract data from it, but first we’ll add a small step to enable us to make a clean compound at the end of this. Let’s pipe our Sphere node through a get Data node. Now we’ll need to get data from a specific vertex, let’s say we’ll use 12 as a test index for our system. Whenever you’re not sure what node to use, just use a keyword in the search box of the ICE view, in this case the word index returns some nodes including one in the Geometry Queries category: Point Index to Location. Connect the geo output from our get data node to the input geo of the Point Index node and you now have a location from the sphere that can be used to extract what we need.

From that location, we’re now able to extract the position and orientation of our vertex (browse through the ICE parameters in the manual to get familiar with them). In this case, we’ll use PointPosition and PointReferenceFrame. We’ll need get data nodes for these. You can either browse through them or type them in directly.

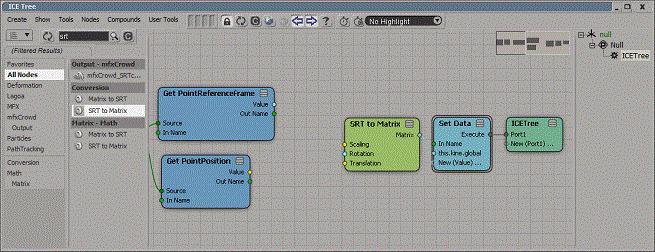
Now, we’ll go to the other end of our ICETree and work backwards a little. What we need to influence is the global transforms of our null, so let’s set the kine.global (from now on, no more animated gifs, you know how it works!). We’ll use “this.kine.global” instead of “null.kine.global” to make our compound reusable on other objects (you could also use self.kine.global). kinematics are represented as a 4×4 matrix though, and those aren’t all that easy to understand and manipulate when you’re not familiar with them, so let’s use a friendlier model. One of the factory nodes is a nice little conversion tool that takes a 4×4 matrix and converts it to SRT data (and one to do just the opposite.

If you try to plug in your PointReferenceFrame directly in the rotation parameter, you’ll notice that it won’t connect. The reason for this is that the data types don’t match. PointReferenceFrame is rotation information stored as a 3×3 matrix, to get pure rotation information from it we can use the Matrix to SRT node. Our PointPosition node is already in the correct format for translation so you can plug that in directly.

Now if you move your sphere around you might notice the null isn’t following the vertex at all. That is because our ICETree is moving around in space and we have to take that into account in our calculations. To do that, we’ll need to multiply our mesh data with the transform matrix of our tracker.

For the PointPosition, this is fairly simple. There is a multiply vector by matrix node that comes built in so let’s use that.

Now the null follows perfectly in translation. The rotation will be a little trickier, we need to find a way to multiply a 3×3 matrix by a 4×4 matrix. What we’ll do is pretend that our 3×3 matrix is actually a 4×4 matrix! Just take your Matrix to SRT node you’ve got coming out of the PointReferenceFrame and plug it into a SRT to Matrix node. Voila! we’ve got a 4×4 matrix that we can multiply with our null’s matrix. We can then take that matrix, extract the rotation, and we’re done!

Now we’ll turn this into a compound so that it’s really easy to use. We need to have 2 inputs exposed, the inName of our getData node and the index of the Location node. To have them exposed instantly when we create the compound, you need to have those ports linking to something that you won’t include in the selection for the compound. We already have our Sphere node to act as the external node for the getData node, we just need to add an integer node to our index port.

We can now select all of our nodes and create a compound. You can edit the properties of the compound to change its color, tasks, etc.

The full compound is available in the download section for those who had a harder time following and would like to have a look at the finished version.

Next week we’ll try to write a script so that we can select multiple vertices, run the script, and have trackers appear for each selected vertex.

-Phil

28
Jan
12

Match All Transforms

This week I decided I’d go with something really basic, making a “Match all Transforms” command that actually works. Anyone who’s ever animated in Softimage knows that this feature is broken when it comes to matching rotations on a keyed object. We’ll write ourselves a little script that acts the same way as the built-in tool except for the part where ours will actually what it’s supposed to do! Since this one will be extremely simple in its execution, I’ll try to explain my thought process a bit more. No matter what the size of the tool I’m attempting to write, I always go through the same steps. I’ll also take the opportunity to introduce functions, this tool doesn’t really require them but I find it cleaner this way and it’s a simple enough tool that we won’t get lost in them.

Step 1: What do I need this tool to do

Since we’re using the current match all transform tool as a reference, we need to have it start a pick session and match the transforms of our selected object to the picked one. Sounds simple enough! From the previous posts, we already know how to handle selections, but what about pick sessions? Lucky for us, the SDK Guide (help menu) is full of examples, most of them available in Python.

Step 2: Break down the tasks in small functions

Let’s start with the tasks we have from step 1 and try to break them down a little more and figure out what building blocks we’ll need.

#1st step:
	#store the selection

#2nd step:
	#pick the target object
	#return the picked object

#3rd step:
	#get the Global transform data of the target object
	#return the extracted transform data

#4th step:
	#apply the transform data to our initial object(s)

#5th step:
	#re-select the initial object(s)

Step 3: Write the actual code

The first step we identified is to store the current selection. If you’ve read the previous posts this isn’t new to you.

We’ll also take the opportunity to set up the usual “xsi” variable, and don’t forget the “tuple” trick we learned last time when setting up the selection.

xsi = Application
sel = tuple(xsi.Selection)

The second step we identified is the one that will start a pick session. From the SDK guide, we know that the way to do this is to use the PickElement command (look through the examples in the SDK if my example code isn’t clear enough). We’ll also make this our first function. We’ll need that function to return something so we can use if later. In this case, we could extract the transforms right now, but for the sake of better understanding the use of functions, let’s just split everything up as much as possible even if it takes a bit more lines to write.

def _pickTarget():
	pick = xsi.PickElement("", "Pick an Object to match pose to")
	item = pick(2)
	return item

The third step will take care of storing the transforms of the object we just picked. We’ll also package this into a small function. When dealing with transforms, always make sure if you should be dealing with global or local transformations. In our case, we want to match the global transforms so that the objects’ transforms end up matching 100% in space.

def _getGlobTransf(item):
	transf = item.Kinematics.Global.Transform
	return transf

Ok, now we know all we need to know about our target object. All that’s left to do is match the global transformations of our selected object. Let’s write another small function that will apply transformations to an object and take care of our 4th step.

def _applyTransforms(transf, item):
	item.Kinematics.Global.Transform = transf

Only one step left; we need to re-select the initial selected objects so that the user can easily key his newly moved objects.

xsi.SelectObj(sel)

Alright! We have all the main steps covered through small easy to understand bits and pieces, now we just need to bring it all together and reorganize things a bit. One important thing to remember when assembling the script together is that we need to have the functions appear BEFORE we call them, otherwise the script won’t be able to find them and will fail. In the end, you should end up with something that looks like this:

## Match All Transforms
## Select the objects that you want to move
## Run the script
## When prompted, pick the target object that you want to match

def _pickTarget():
	pick = xsi.PickElement("", "Pick an Object to match pose to")
	item = pick(2)
	return item

def _getGlobTransf(item):
	transf = item.Kinematics.Global.Transform
	return transf

def _applyTransforms(transf, item):
	item.Kinematics.Global.Transform = transf

xsi = Application
sel = tuple(xsi.Selection)

target = _pickTarget()
tgtTransf = _getGlobTransf(target)

for item in sel:
	_applyTransforms(tgtTransf, item)

xsi.SelectObj(sel)

Save this as a button and click away, or better yet save it as a Script Command and you’ll be able to map it to a key and never have use the broken default tool ever again!

-Phil

21
Jan
12

FCurves Interpolation

Hi, for our next tool, we’ll learn how to change the interpolation style on FCurves. This can be really useful when you want to move from blocking to first pass, I use it all the time when working on shots. We’ll need to build a list of the transform parameters (if you’re wondering where you can find those or how to properly write them, just select any object in your scene and go through the sdk explorer View–Scripting–SDK Explorer / Ctrl+Shift+4, once there go into the Parameters section, find the parameters you want and look in the scriptname column). We’ll also need to lock the current selection so that no matter what we do, the script will remember which items were selected when we pressed the button, to do that we’ll use a tuple to store the list permanently (Application.Selection is dynamic, so the script could forget what was used in the beginning).

xsi = Application
parameters = ["posX", "posY", "posZ", "rotX", "rotY", "rotZ", "sclX", "sclY", "sclZ"]
selection = tuple(xsi.Selection)

Next, we’ll go through each of our selected items, loop through their parameters and check if they’re keyable. If they are we’ll grab their FCurves (if they exist) and change the interpolation type

1 = Constant (step)
2 = Linear
3 = Spline

for item in selection:
	for param in parameters:
		parameter = item.kinematics.local.Parameters(param)
		if parameter.Keyable:
			fcurve = parameter.Source
			if fcurve != None:
				fcurve.Interpolation = 1

Now, we could replicate the script and change the value and have one button for each type of interpolation OR, we could add a little trick to change the behavior of the button depending on what key (shift, ctrl, alt) the user is pressing when he clicks the button.

To be able to do that, you’ll need to know what is pressed and the way to do that is through the GetKeyboardState function. Look for it in the manual, experiment with it, try out different combos, have fun with it.

ks = xsi.GetKeyboardState()

shift = 1
ctrl = 2

if ks(1) == shift:
	interpolation = 1
elif ks(1) == ctrl:
	interpolation = 2
else:
	interpolation = 3

So in the end, our code could look something like this:

## This script switches the interpolation of the selected object's transformation FCurves.
## Hold Shift while running the script to switch the FCurves to constant
## Hold Ctrl while running the script to switch the FCurves to linear
## Hold anything else or nothing at all while running the script to switch the FCurves to spline

xsi = Application
parameters = ["posX", "posY", "posZ", "rotX", "rotY", "rotZ", "sclX", "sclY", "sclZ"]
selection = tuple(xsi.Selection)
ks = xsi.GetKeyboardState()

shift = 1
ctrl = 2

if ks(1) == shift:
	ipl = 1
elif ks(1) == ctrl:
	ipl = 2
else:
	ipl = 3

for item in selection:
	for param in parameters:
		parameter = item.kinematics.local.Parameters(param)
		if parameter.Keyable:
			fcurve = parameter.Source
			if fcurve != None:
				fcurve.Interpolation = ipl

In this example, the default interpolation will be Spline. If you run the script while pressing shift, it will switch the keys to constant interpolation, ctrl will switch it to linear, anything else (including nothing) will give you splines.

14
Jan
12

Keep Ref Keys

Hi! Sorry for the wait, long story short I broke my ankle and didn’t have access to my computer due to ergonomic issues.

I asked someone from work which tool I should start with, a simple one with not too many bells and whistles, a simple one button solution. As he suggested, I’ll start off with a simple tool that will keep the animation keys only on frames where a reference object has keys. I don’t personally use this tool a lot but it was requested by a lot of animators during my last project so I figure other people might find it interesting. At the very least it will teach you how to interact and manipulate keys and FCurves through scripting.

Now, let’s start with the basics. How to approach a problem like this? What will we need?

We’ll need a source object from which to get our frames to keep and we’ll need a target object that has a lot of keys that we want to clean up. We’ll also need to know how to access the frame number for each key and how to delete keys at specific frames. Since this will be a one button solution, let’s keep things simple. We’ll predetermine the order in which the objects need to be selected and go from there.

First, let’s write a small description of what the script will do and how to use it. It might seem like useless work now but if you ever need to revisit it later on, you’ll be glad you did. It also makes it easier to distribute it if it comes with it’s own instruction manual. We’ll also set up some variables that we’ll be using throughout the script

#
##  This script keeps only the keys on the target object for frames matching the source object's keyed frames
##  Instructions:
##     Select the target object you want to clean up
##     Select the object you want to use as a source
##     Run the script

##  -------------------------------------------------------------------------------------------------

from win32com.client import constants as c
xsi = Application
target = xsi.Selection(0)
source = xsi.Selection(1)

Now that these are setup they can be reused throughout the script easily. Next we’re going to create a list of keyed frames from the “source” object, which we will use as a reference for which keys to keep on the “target” object. The way to do this is to first create an empty list and then append the values to it as we go through each of the animatable parameters (in this case we’ll use only the transforms).

To get access to the frames where keys are stored, you need to first get the FCurves, from those you can then get the keys, and then from the keys you can isolate the “.Time” parameter which is actually the frame information. I usually round up the value at this point because in some cases, you might actually get a floating value like 0.9997 or 0.0001 instead of the actual integer frame numbers (not sure why exactly) so by rounding up the value, you can keep keys that are on the closest full frame for your target object. We also want to make sure not to have multiple entries of the same frame to speed things up later on.


##  ------------------------------------------------------------------------------------------------

##  Create a list of keyed frames from the source object

keepList = []
for param in ["posX", "posY", "posZ", "rotX", "rotY", "rotZ", "sclX", "sclY", "sclZ"]:
	parameter = source.kinematics.local.Parameters(param)
	if parameter.Keyable:
		FCurve = parameter.Source
		keys = FCurve.Keys
		for key in keys:
			if key.Time not in keepList:
				keepList.append(round(key.Time))

##  ------------------------------------------------------------------------------------------------

Now that we have a list of frames on which there are keys on our source object, we need to make a list of all the frames we want to delete keys from. We could build a list of all the keys from the target object, get the curves, keys and frames from that. Sometimes that can be a valid approach, but from my experience it’s usually faster to just use the timeline and work from there.

What we’ll do is create a list of frames on which we’d like to delete keys by going through the timeline and adding frames that can’t be found in our keepList to this new deleteList.


##  ------------------------------------------------------------------------------------------------

##  Create list of frames to delete
PCIn = xsi.GetValue("PlayControl.In")
PCOut = xsi.GetValue("PlayControl.Out")
deleteList = []
for frame in range(int(PCIn), int(PCOut+1)):
	if not frame in keepList:
		deleteList.append(frame)

##  ------------------------------------------------------------------------------------------------

Now that we have our list of frames to delete, it’s just a matter of deleting all keys for those frames. To be able to do that though, you’ll need a string containing the parameters to delete keys from.


##  ------------------------------------------------------------------------------------------------

##  Delete Keys from deleteList frames

for frame in deleteList:
	parameters = target.kinematics.local.Parameters.GetAsText()
	xsi.DeleteKeys(parameters, frame, frame, False, 0, "siAnimatedParameters")

##  ------------------------------------------------------------------------------------------------

Ok, we’re done! Of course this could probably be done some other ways, this is only a simple approach to start showing you the basics of writing small tools to make your lives easier. We could put in some error checking mechanisms to make sure the selection’s good, add the option to pick the objects instead of selecting them beforehand, we could rewrite it so that it can use more than 2 objects, a lot of improvements could be done to it but as far as simple solutions to solve a simple problem goes, this is good enough. This kind of tool might take anywhere from 5 minutes to a couple of hours to write depending on how comfortable you are with python, softimage, and how fast you can find stuff in the SDK help menu. The more you play around with the automation of tasks like these, the faster you’ll get!

If you have any questions or suggestions, feel free to comment. I’ll gladly take requests for tools and examples.

I’ll try to do a post every one or two weeks, depending on how much free time I get from work and life in general.

-Phil


Enter your email address to follow this blog and receive notifications of new posts by email.

Join 5 other subscribers